

Saturday, April 16, 2011
Cameron and Munchkin
I've been meaning to post this layout for a while. I created this layout for layout tag February layout tag at Kindred Creations. I was asked to lift this layout by Andrea, so I definitely wanted to go digital as well, and work off her great style!
 I created this layout in GIMP. I used elements from a KC Challenge Freebie by Lisa Habisreutinger; I adjusted the colours to better suit this layout. I also added the stitched notebook page element from my own Majestic India kit (again, altering the colours), ribbon, string, brads, tickets, and paw print brush. I extracted the top from one of the pictures. I used the fonts Glider Girls, My Nerd, and Harting 2 Ultra Light. I love how this layout turned out!

Monday, April 11, 2011
Country Girl
My dear friend Susan saw this stamp and thought of me because she knows my love of Sarah Kay stamps and that we raise poultry. So last week I received it as a RAK in the mail from her and I just had to ink it up and try it out. I also finally got my hands on some Neenah card stock and just had to try that out as well! (I don't live close to any scrapbook stores so I don't get out that often.)

I stamped the Sarah Kay Country Girl image onto the Neenah card stock using StazOn. (That is another thing I really want to experiment with, as some may notice I am still pulling a little bit of the black ink into the image as I am colouring.) I coloured the image using Lyra artist pencils and Gamsol. I created a square card base. I then used patterned paper from the Pink Paisley Sweetness collection. I matted the long strip with card stock that I edged with the Martha Stewart doily border punch. I stitched around each of the layers. Next I wrapped the card front with yellow ribbon and added a bow I tied using the bow easy. I mounted the matted image on the card using foam adhesive. I added a butterfly with some jewels for it's body to the top left hand corner of the image. On the other side of the card I added three flowers, a rose and two die cut flowers I shaped and added the large pearly stamens to. I tucked some branches cut with the Martha Stewart twig punch under the flowers. Lastly I added some jewels to the corners of the blue/brown mat.

I stamped the Sarah Kay Country Girl image onto the Neenah card stock using StazOn. (That is another thing I really want to experiment with, as some may notice I am still pulling a little bit of the black ink into the image as I am colouring.) I coloured the image using Lyra artist pencils and Gamsol. I created a square card base. I then used patterned paper from the Pink Paisley Sweetness collection. I matted the long strip with card stock that I edged with the Martha Stewart doily border punch. I stitched around each of the layers. Next I wrapped the card front with yellow ribbon and added a bow I tied using the bow easy. I mounted the matted image on the card using foam adhesive. I added a butterfly with some jewels for it's body to the top left hand corner of the image. On the other side of the card I added three flowers, a rose and two die cut flowers I shaped and added the large pearly stamens to. I tucked some branches cut with the Martha Stewart twig punch under the flowers. Lastly I added some jewels to the corners of the blue/brown mat.
Thursday, April 7, 2011
Shine!
I've decided to do another clear card. I cut out the word Shine with two mats from two of colours of card stock and layered them back together. I then mounted the word onto a label using foam adhesive.

I also coloured some plumeria flowers, printed them out and cut them out. I took the Spellbinders In Spades border die and cut two out from two of the colours of cardstock, as well as leaves from the greenest shade using the Martha Stewart twig punch. I started assembling the whole thing by edging a clear card base using mint Liquid Pearls (paint is easier to control and get on cleanly but I didn't have any in a coordinating colour). I then layered the ribbon around the card part way from the bottom, I only adhered until the front centre, but left it long enough so I could cut to length later.
 I started by assembling the inside of the card, so that I knew what I would be able to see through the card when working on the front. I added an arrangement of plumeria to the inside of the card, tucked some leaves all around and layered the two In Spades borders over the ribbon that is on the outside of the card. I added some drops of Stickles into the holes on the border die cut, completing the inside.
 I then moved to the front of the card and adhered the label with the word shine over the ribbon and in such a way that the plumeria from the inside frame the label. I took three more plumeria and added them to the front for more depth to the arrangement and tucked in more leaves. Lastly I tied a bow from the ribbon using the bow easy and adhered it onto the ribbon on the lower left hand side of the label, and in the middle of the plumeria. I then cut the ribbon to length. Lastly I took mirror images of the plumeria on the front, and another label and adhered them to the front inside directly over their counterpart on the front to hide the glue and add colour. The label on the inside also provides a place to write something on the card.


Thursday, March 31, 2011
Cherry Blossoms
 I created a card using a cherry blossom image. I started by opening up my editing software and lengthening the image by duplicating parts of the image and then splicing it back together, which made it perfect for the business envelope size card (8.5x3.75"). I started by creating the base and used twinkling H20s to colour the edges that would be visible. I then cut another layer of white card stock slightly smaller than the front of the card and ran it through the Cuttlebug with the Swiss dots embossing folder. I then rotated the card stock and placed it back in the folder fitting the dots into the dots on the folder and ran it close to the edge of the folder so you can't see any marks from the edge of the embossing folder. I cut one Spellbinders In Spades Pendant die from gold card stock, cut it in half and used it as a photo corner on the white card stock. I then printed out the cherry blossom image. I coloured it using 2 shades of pink Twinkling H20s and water pens. I used Lyra artist pencils to colour the stems to keep more of the focus on the blossoms. I then used a burgundy gel pen to colour the stamens and gold Liquid Pearls to give colour and dimension to the tips of the stamens. When it was all coloured I cut the image out. I then tied a gold edged sheer white ribbon around the embossed mat and tied a bow using the bow easy. I adhered the cherry blossom image just over the ribbon using foam adhesive for added dimension.
The great thing is that you can print the image out quite large and use it as the main focal point leaving the rest of card relatively simple, or you can print it smaller and leave room for lots of detail.
Wednesday, March 30, 2011
In Memory of Baby Lucas
This is one card I hope to never have the occasion to create again. My heart goes out to the family who had to say goodbye to their newborn baby boy. I know how excited they all were about the arrival of this baby. Though under the circumstances I was glad to create this baby sympathy card and support them in the difficult days ahead.

 I started with a blue card stock. Then using black card stock I cut a frame using the Spellbinders Fleur de Lis border die. For the shorter lengths I took the border strip out of the die after I embossed it, moved it over 2 repetitions and ran it through the Cuttlebug again to shorten it and also used that to create the corner pieces. After I glued down the frame I scored and cut the card stock to create the base of the card leaving the same space all around the frame. I then layered white and blue card stock over the opening in the frame. I stamped the Heartfelt Creations Decorative Vintage Cross with black StazOn ink onto the blue card stock. Then I stamped baby feet ($store stamp) using VersaMark, and embossed the Impression Obsession 'With Sympathy' sentiment using white embossing powder. I also stamped the cross onto black as well as blue card stock and embossed with white embossing powder. I cut the cross out of the black card stock and the flower and leaves out of the blue embossed card stock. I highlighted the flower with a blue artist pencil and the leaves with a green artist pencil. I then layered it over the original using foam adhesive, though I only used the foam adhesive on the petals of the flower. I added the leaves to the original layer raising the tips with rolled glue dots. Lastly I added blue KaiserCraft Pearls to the center of the flower and the corners of the card.
I cut two more sets of panels in a similar size to the front from black and white card stock. Using the font Marnie Regular I printed Philippians 4:6-7 on the left panel, and a coordinating sentiment on the right panel. Using Cloudy Blue Adirondack ink I stamped the Decorative Vintage Cross over the bible verse, and the foot prints on the lower right hand corner of the right side panel. I then adhered the black and white panels to each side.
I really wanted to make this card specifically to suit a baby boy, instead of a generic sympathy card, I also knew I had incorporate our faith that is giving them the strength to endure. Therefore I chose to use the baby blue colour along with the traditional black colour of mourning and white for peace. Then added the baby feet stamp. I repeated the same stamps on the inside of the card and a personalized sentiment.


I cut two more sets of panels in a similar size to the front from black and white card stock. Using the font Marnie Regular I printed Philippians 4:6-7 on the left panel, and a coordinating sentiment on the right panel. Using Cloudy Blue Adirondack ink I stamped the Decorative Vintage Cross over the bible verse, and the foot prints on the lower right hand corner of the right side panel. I then adhered the black and white panels to each side.
I really wanted to make this card specifically to suit a baby boy, instead of a generic sympathy card, I also knew I had incorporate our faith that is giving them the strength to endure. Therefore I chose to use the baby blue colour along with the traditional black colour of mourning and white for peace. Then added the baby feet stamp. I repeated the same stamps on the inside of the card and a personalized sentiment.
Friday, March 25, 2011
Bold Damask
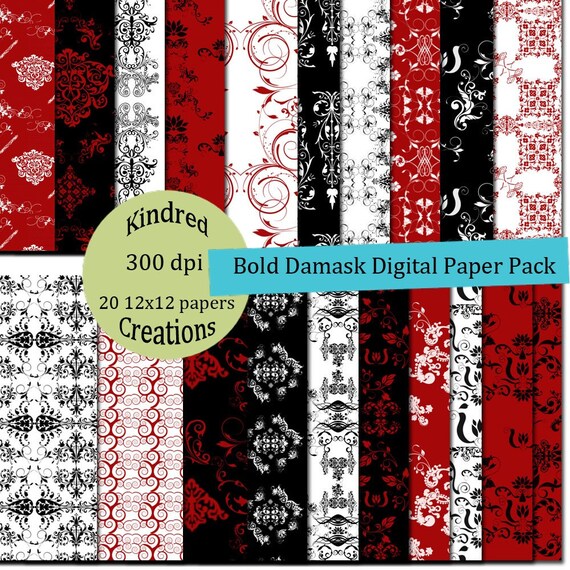 Kindred Creations has had a Deal of the Day blog for almost 2 years now. Recently however Kindred Creations has started adding a weekly Digital Deal of the Week to satisfy all those digital and hybrid crafters as well as those who like to print their own papers.
This week the Digital Deal of the Week is this Bold Damask paper kit. Aren't they just awesome! The best part is that you can pick up this paper pack for only $1! You can always pick up some of the past Deals of the Week in the Kindred Creation Store at prices that are still very reasonable.

Wednesday, March 23, 2011
Magnolia cup sleeve.


