Showing posts with label hybrid. Show all posts
Showing posts with label hybrid. Show all posts
Friday, January 27, 2012
God won't give me anything I can't handle
Kindred Creations has yet another great new digital kit coming out today, the Chocolate Sky paper pack.
 Some friends have been going through a rough patch lately so I decided to make a card for them. I love this quote by Mother Teresa and printed it out using the font Kaufmann BT along with the digital papers. I rotated the striped paper 45 degrees before cropping it to size. I cut out the quote along with the two patterned papers. I matted the larger paper with dark brown card stock just smaller than my card base. I then cut a piece of white card stock and edged it with the Martha Stewart Deco Flowers PATP punch, then cut the second patterned paper to fit just inside the edge of the flowers to create a thin border and edged the patterned paper with a Prismacolor marker. I matted the quote with some coordinating DCWV card stock and adhered all the layers together, adding a layer of foam adhesive under the white decorative border. I then used the Martha Stewart twig punch as well as the Nellie Snellen Leafy Branch punch to create foliage from the white and DCWV card stock. I coloured the white twig punchies with the Prismacolor marker and layered them onto the two corners of the striped paper and added a number of Prima flowers which I centered with pearls.

Monday, January 23, 2012
Computer Guy Birthday card
I have to say Mo Manning has some incredible images for young boys, which are sometimes a little hard to find... and digi is so easy to buy in a pinch and work with that same day! Love that! I needed yet another birthday card for a young boy and this image suited him well.

I started by printing the Mo Manning digital image onto X-Press It card stock and colouring it with Lyra artist and Sansodor. I then printed out some DCWV 300DPI digital papers. I stitched them together with a card stock mat and layered them together. I double matted the image. I added three diamond eyelets onto the green paper and added some Liquid Pearls to the center of each eyelet. I also added a photo turn to the top of the matted image. I then adhhered the layers onto the white card base adding the image with foam adhesive. Lastly I stamped a Whimsy stamped sentiment onto the yellow card stock with navy ink and added it to the top right hand corner of the image with more foam adhesive.

I started by printing the Mo Manning digital image onto X-Press It card stock and colouring it with Lyra artist and Sansodor. I then printed out some DCWV 300DPI digital papers. I stitched them together with a card stock mat and layered them together. I double matted the image. I added three diamond eyelets onto the green paper and added some Liquid Pearls to the center of each eyelet. I also added a photo turn to the top of the matted image. I then adhhered the layers onto the white card base adding the image with foam adhesive. Lastly I stamped a Whimsy stamped sentiment onto the yellow card stock with navy ink and added it to the top right hand corner of the image with more foam adhesive.
Saturday, January 21, 2012
Baby Girl Baptism
I used another Mo Manning digital image and the coordinating Kindred Creations Cutie Pie Farm kit to match the Baby Boy Baptism card.
 I started by printing the image onto X-Press it card stock and colouring it with Lyra artist pencils and Sansodor. I went over the lace of the dress with a Sakura Stardust glitter pen to add a little girly sparkle. I printed the papers from the Kindred
Creations Cutie Pie Farm kit. I layered the pink striped paper over my card base then
added a strip of the green dotted paper which I wrapped with a piece
of ribbon tied in a bow. I then used the Martha Stewart Deco Flowers PATP on
the brown dotted paper and lined the inside with the floral paper. I
adhered it to the card using foam adhesive and slipped the ribbon bow
through the brown card stock. I then also added the image which I cut
out in a circle using foam adhesive. I added some Prima flowers with Pearl and pearl stamen centers to the top right
hand corner. I punched and cut various leaves from the green dotted paper to finish off the floral arrangement.
I started by printing the image onto X-Press it card stock and colouring it with Lyra artist pencils and Sansodor. I went over the lace of the dress with a Sakura Stardust glitter pen to add a little girly sparkle. I printed the papers from the Kindred
Creations Cutie Pie Farm kit. I layered the pink striped paper over my card base then
added a strip of the green dotted paper which I wrapped with a piece
of ribbon tied in a bow. I then used the Martha Stewart Deco Flowers PATP on
the brown dotted paper and lined the inside with the floral paper. I
adhered it to the card using foam adhesive and slipped the ribbon bow
through the brown card stock. I then also added the image which I cut
out in a circle using foam adhesive. I added some Prima flowers with Pearl and pearl stamen centers to the top right
hand corner. I punched and cut various leaves from the green dotted paper to finish off the floral arrangement.


Friday, January 20, 2012
Baby Boy Baptism card
For this card I used a Mo Manning digital image as well as the Kindred Creations Sweetie Pie Farm digital kit.
 I printed the image onto X-Press It card stock, coloured it with Lyra artist pencils and Sansodor. I printed the papers from the Kindred Creations Sweetie Pie Farm kit as well as the a few star embellishments. I layered the blue striped paper over my card base then added a strip of the green dotted paper which I wrapped with a piece of knotted ribbon. I then used the Martha Stewart Deco Flowers PATP on the brown dotted paper and lined the inside with the star paper. I adhered it to the card using foam adhesive and slipped the ribbon knot through the brown card stock. I then also added the image which I cut out in a circle using foam adhesive. I added some swirls cut with a Marianne Designs die and the the stars from the kit to the top right hand corner. The stars were adhered using some more foam adhesive.

Friday, January 13, 2012
Birthday Hockey Card
I created this card for a boy who just loves to play hockey. In the fall I had the opportunity to watch him play and taken some pictures, so I was able to go back and find out his team colours. So I used his team colours for this card.
 I started by printing out the Mo Manning Hockey Boy image. I coloured it with Lyra artist pencils and Sansodor, and matted it with an amber card stock. I then printed some patterned paper from the Kindred Creations Black and White digital paper kit available in the store now. I started with a square base and layered it with a slightly smaller layer of the stripes 2 paper. I then took a piece of the herringbone paper and matted it in the amber card stock and stitched them together. I then took a piece of the spots 2 paper the width of the card and matted it with the amber card stock and used a zig zag stitch along the top and the bottom. I took a piece of yellow mesh and wrapped it around the card a third of the way up the layer, along with a piece of twine which was threaded through a black button and tied in a bow. I then adhered the image over that with foam adhesive. Lastly I embossed a Whimsy Stamps Party Mini Letter Seals stamp along with a Just Rite border stamp onto the Herringbone patterned paper and adhered it with some more foam adhesive.

Sunday, December 25, 2011
Merry Christmas
I would like to wish you all the blessing of Christmas, and I hope you have the good fortune of spending time with those you love this holiday season. We have all our family gatherings on other days so today we will be spending the day with friends and all the lovely people at our local soup kitchen.
 I created this frame using a wonderful piece of word art I found as well as the Classic Christmas digital paper pack from Kindred Creations.

Thursday, December 15, 2011
Retro Christmas Tree

Saturday, October 8, 2011
Vintage Postcard

Friday, October 7, 2011
Irish Blessing

Monday, September 26, 2011
Fallen Leaves

Saturday, May 7, 2011
Blue bonnets

Friday, May 6, 2011
Forsythia and Flowering Almond


These precoloured images are a great easy way to create a quick card, and the great thing about an almost all digital card is that if I ever want to create a second or third card, the file is sitting on my computer and all I have to do is print, cut, fold and add a little bit of bling.
Monday, April 18, 2011
Bambino
I created this card for Challenge 57 at the Sugar Bowl.
 I started with a 5 1/2" square base. I then printed out papers from the Wisteria Moments Apple Blossom Time digital kit. I must say they printed much darker than they appear in the kit and the plum turned out an aubergine colour. I matted the plaid paper with some light purple card stock which I edged with scalloped deco scissors, and stitched around it. I also matted the strip of green patterned paper with the purple card stock, and stitched around them. After I also adhered these to the base I added four purple KaiserCraft jewels to the outer corners. I then cut out the round mat from Monica Bjork on my Silhouette, added a green inner circle, which I also stitched together then adhered to my base. I then coloured the Sugar Nellie Bambino stamp using Lyra artist pencils and cut it out using a Spellbinders Labels 4 die, then mounted that with foam adhesive on a larger Labels 4 cut from purple card stock, which was centered on round mat. I then also added KaiserCraft jewels to the round mat. I tied a bow from sheer purple Offray ribbon using the bow easy and adhered it below the image, tucked in some leaves cut with the Martha Stewart twig punch, then dangled a moon shaped pendant with some beads from a small safety pin. Above the image I arranged a bunch of purple ribbon roses with the same leaves, as well as some flourish die cuts.
I love the colour combo of this challenge even though I don't often use purple. I would likely have done this image in typical baby blue for a baby boy, but I love the result here and if I'd coloured the little bambino's cap purple this same card would have seemed a bit more baby girl to me. Though I think it is still neutral enough to be used for either I think.

I love the colour combo of this challenge even though I don't often use purple. I would likely have done this image in typical baby blue for a baby boy, but I love the result here and if I'd coloured the little bambino's cap purple this same card would have seemed a bit more baby girl to me. Though I think it is still neutral enough to be used for either I think.
Thursday, April 7, 2011
Shine!
I've decided to do another clear card. I cut out the word Shine with two mats from two of colours of card stock and layered them back together. I then mounted the word onto a label using foam adhesive.

I also coloured some plumeria flowers, printed them out and cut them out. I took the Spellbinders In Spades border die and cut two out from two of the colours of cardstock, as well as leaves from the greenest shade using the Martha Stewart twig punch. I started assembling the whole thing by edging a clear card base using mint Liquid Pearls (paint is easier to control and get on cleanly but I didn't have any in a coordinating colour). I then layered the ribbon around the card part way from the bottom, I only adhered until the front centre, but left it long enough so I could cut to length later.
 I started by assembling the inside of the card, so that I knew what I would be able to see through the card when working on the front. I added an arrangement of plumeria to the inside of the card, tucked some leaves all around and layered the two In Spades borders over the ribbon that is on the outside of the card. I added some drops of Stickles into the holes on the border die cut, completing the inside.
 I then moved to the front of the card and adhered the label with the word shine over the ribbon and in such a way that the plumeria from the inside frame the label. I took three more plumeria and added them to the front for more depth to the arrangement and tucked in more leaves. Lastly I tied a bow from the ribbon using the bow easy and adhered it onto the ribbon on the lower left hand side of the label, and in the middle of the plumeria. I then cut the ribbon to length. Lastly I took mirror images of the plumeria on the front, and another label and adhered them to the front inside directly over their counterpart on the front to hide the glue and add colour. The label on the inside also provides a place to write something on the card.


Friday, March 25, 2011
Bold Damask
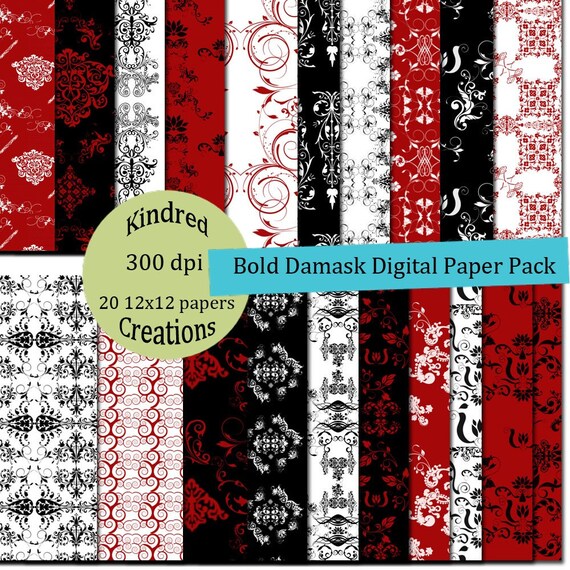 Kindred Creations has had a Deal of the Day blog for almost 2 years now. Recently however Kindred Creations has started adding a weekly Digital Deal of the Week to satisfy all those digital and hybrid crafters as well as those who like to print their own papers.
This week the Digital Deal of the Week is this Bold Damask paper kit. Aren't they just awesome! The best part is that you can pick up this paper pack for only $1! You can always pick up some of the past Deals of the Week in the Kindred Creation Store at prices that are still very reasonable.

Wednesday, March 23, 2011
Magnolia cup sleeve.


Wednesday, September 15, 2010
Haley

Monday, September 13, 2010
Thank You cards
I created two thank you cards that I want to share with you.
 I created this first card using half a sheet of transparency for my base. I then used the DCWV La Creme digital kit. I reduced the patterns to a 6x6 size before printing them on white card stock. I used the black pattern paper for the insert on the inside of the card. I cut a scalloped mat just larger than the insert from stitchflowers paper using the Silhouette. On top of the insert I used the element that says Beauty which I altered in Gimp by removing the word Beauty and adding the sentiment Thank You. I re-sized it to suit the front of the card and trimmed the image so there would be the same sized edge all around the black frame of the element. I created a template for the tag so that I could use the print and cut feature of the Silhouette to print and cut around the tag. I then used the blackwallpaper paper along the bottom of the front on both the sides of the transparency. On the front side I added a piece of cream trim along the top side of the patterned paper. I then took the flowerstem element and extracted a template from it that I could cut with my Silhouette from the tanburlap paper. I then inked the edges with Antique Linen Distress Ink before adhering it above the trim, to the left side of the tag. The result is a classic whimsical Thank You card.
 For the second card I started with a red quarter fold card stock base. I then cut a slightly smaller piece of white card stock which I ran through the Cuttlebug using the Tim Holtz Damask embossing folder using a shim to avoid embossing the area where the sentiment is placed. (Check the Cuttlebug blog for a tutorial on this technique.) I then used the piece I cut out of the shim to emboss the edge around the blank area with an embossing stylus to make it pop and define the area more. I adhered this to the front of the card. I printed three damask shapes onto white card stock and cut it the same height as the embossed card stock. I matted this with black card stock and added red KaiserCraft pearls to the corners. I added this to the left side of the card leaving a strip of embossed card stock showing. I then finished it off by stamping the Thank You sentiment form Inque Boutique using red Adirondack ink to the front of the card.

Using a very similar design I created a digital version that I would like to share with you. The sheet has 2 cards that can be printed, cut and folded for a quick Thank You card. You can download the card here.


Using a very similar design I created a digital version that I would like to share with you. The sheet has 2 cards that can be printed, cut and folded for a quick Thank You card. You can download the card here.
Sunday, July 4, 2010
Altered Journal
 This week I am a prayer partner for SERVE, a program where youth travel for a week to another community to perform service work for financially challenged families or the organizations that serve them. My prayer partner is actually one of the leaders that accompanied the youth. I'll be creating a little something to encourage him throughout the week, and I hope to be sharing these projects with you here this week. For the first day I thought I would provide him with a journal to write in throughout his stay (and beyond) and I altered it by adding the theme verse to the front cover. I started by creating a piece of word art for the front cover. The Theme verse is from James 5:11 (the Message), and I used FLW Script and Bud Easy. I placed this on a background using 3 papers, tan burlap, black pattern and spalding, from DCWV La Creme digital kit. I printed this out onto plain white card stock. I cut it out and covered it with a clear mac-tac, folding the edges over to the back. I then glued that to the front cover of the journal.
Monday, May 17, 2010
King of the Dance Floor
 I was inspired by Andrea's layout in another rendition of layout tag. Andrea creates digitally, and extracted her image from the photograph. I had wanted to scrap this picture for ages but I always found the background distracting. This was the perfect opportunity to try something different... I went hybrid. I extracted the ring bearer and the bridesmaid from the picture. I used a background paper from DCWV La Creme digi kit, however I wasn't too excited by the colour of the paper. Therefore I extracted the lace edge from the paper and placed it over some paper from my own 'A little bit of Glamour' kit. I added a drop shadow to the photograph. I then added my title using various fonts (Kingthings Petrock, Milk and Cereal, One Fell Swoop). I added a crown image behind the word KING. After which I removed the word KING again so that I could later add it as a paper element. I then printed out the layout on quality photo paper and let it dry. When it was dry enough to work with I added Kaiser craft jewels to the crown and the 'lace' edge. I cut the word KING out of black card stock covered with Forever Violet Perfect Pearls using the Kingthings Petrock font. I then ran it through my Cuttlebug using the Victoria embossing folder and adhered it to the layout using foam adhesive. Underneath the title I placed two purple satin butterflies that using Matte Accents to lift their wings. At the top of the page I added a tab that I stamped the date onto with white embossing powder. I cut the tab from a piece of purple card stock, folded in half and punched the corners with a corner rounder.